
The forex market processes over $7.5 trillion in daily turnover, according to the Bank for International Settlements’ most recent Triennial Survey. Retail traders account for a small fraction of that volume, and data from the European Securities and Markets Authority (ESMA) shows that between 74% and 89% of retail CFD accounts lose money. A significant reason behind that number isn’t bad analysis — it’s poor risk sizing. You can be right about market direction 60% of the time and still lose money if your losing trades are three times larger than your winners.
This guide teaches you the 1–2% risk rule, how position sizing actually works on small accounts, how to calculate lot size before every trade, and why drawdown math matters more than any single trade outcome.
Key Takeaways
- Why the 1% rule should remain stable even as your account grows.
- The difference between risk amount, position size, lot size, margin, and how they interact.
- How the 1–2% rule works on $100, $500, and $1,000 forex accounts.
- How to calculate position size using account balance, risk percentage, stop-loss distance, and pip value.
- Why a wider stop loss usually require a smaller lot size, not a larger risk.
- How drawdown accelerates after repeated losses and why survival math matters more than single-trade confidence.
- How to limit total exposure when trading multiple currency pairs at the same time.
What forex risk management means
Forex risk management is deciding how much money you are willing to lose on a trade before you enter it. It includes setting a risk percentage, calculating position size, placing a stop loss, etc. It essentially means controlling how much of the account is exposed through open trades and adjusting for different instruments.
Good forex risk management does not remove market risk. It does not guarantee profits or prevent losing streaks. It keeps each loss small enough that the account can survive a normal run of wrong trades — and that’s the only thing that gives you time to learn, adjust, and improve.
Risk management starts before you open the chart.
Here’s the mistake this guide exists to fix: most beginners spend 90% of their preparation time on where to enter a trade and almost no time on what happens when the trade is wrong. They focus on potential profit while ignoring the cost of being incorrect.
Every trade you take has a probability of failure. Even strategies with a strong historical edge produce losing trades in clusters. If your account cannot absorb five, six, or seven wrong trades in a row without suffering permanent damage, the quality of your entries becomes irrelevant. The account is gone before the edge has time to work.
Survival comes before profit targets. A $500 account that preserves 90% of its capital through a bad week can still trade next week. A $500 account that loses 40% on two oversized positions is now a $300 account — and the math to recover from that point is significantly harder, as you’ll see later in the drawdown section.
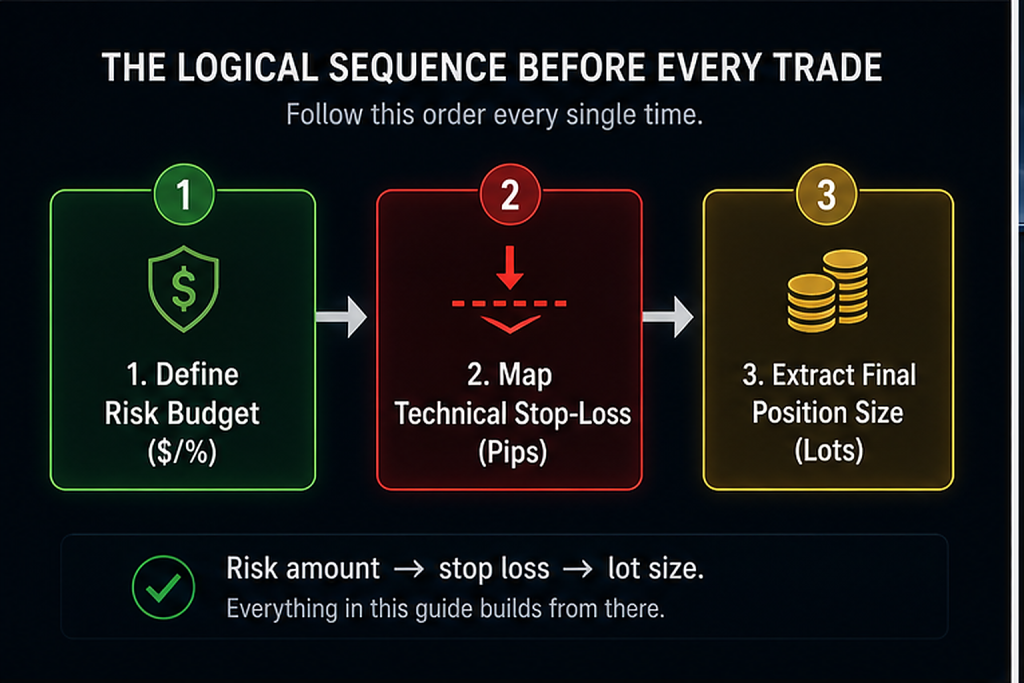
The working rule for this entire guide is simple: decide the risk amount first, then place the stop loss based on the chart structure, then calculate the lot size around both. If you remember nothing else from this post, remember that sequence. Risk amount → stop loss → lot size. Everything in this guide builds from there.
Five terms you need before the first formula
Before you touch a calculator, you need to understand five terms that beginners constantly confuse with each other. Getting these wrong is where most position-sizing errors start.
Risk amount is the money you are prepared to lose on a single trade if the stop loss is hit. On a $500 account using 1% risk, the risk amount is $5. That $5 is the maximum planned loss — not the position size, not the margin, and not the lot size.
Position size is the volume of the trade, expressed in lot units, that determines how much each pip of price movement is worth in your account currency. A larger position means each pip is worth more money. Position size is the variable you calculate after you know the risk amount and stop-loss distance.
A stop-loss is the price level where the trade closes automatically if the setup is wrong. It’s a planned exit point, not a safety guarantee. During fast markets, spread spikes, or low-liquidity conditions, the actual fill price can differ from the stop level. FOREX.com’s risk management course explains this distinction clearly — a stop-loss order triggers a market-style exit once the level is hit, which means the execution price can slip past the intended level.
Lot size is the standardised trade volume in forex. A standard lot is 100,000 units of the base currency, a mini lot is 10,000, a micro lot is 1,000, and some brokers offer nano lots at 100 units. On a standard lot trading EUR/USD, each pip is worth approximately $10. On a micro lot, each pip is worth approximately $0.10. MyFXBook’s lot size guide breaks this down by account type if you want the full reference.
Leverage increases the size of the position you can open relative to your account balance. It does not increase your skill, your edge, or your ability to read the market. A $500 account with 1:100 leverage can open a position worth $50,000 — but if the trade moves 1% against you, that’s a $500 loss, which is your entire account. The margin required to open a trade is not the same as the amount that can be lost.
Why a $5 risk does not mean opening a $5 trade
This is the confusion that damages most accounts. In forex, trade size is based on lot volume and pip value, not on the dollar figure in your risk budget. A $5 risk amount might translate into 0.01 lots on one setup and 0.05 lots on another, depending entirely on how far the stop loss sits from the entry.
A 20-pip stop and a 50-pip stop cannot use the same lot size if the risk amount stays fixed at $5. The wider the stop, the smaller the lot size must be — or the dollar risk climbs above what you planned.
The table below shows how the same $5 risk translates into different lot sizes depending on stop-loss distance, assuming EUR/USD, where one micro lot (0.01) has a pip value of approximately $0.10.
| Risk Amount | Stop-Loss Distance | Required Lot Size | What Happens if Lot Is Too Large |
|---|---|---|---|
| $5 | 10 pips | 0.05 lots (5 micro lots) | Each extra micro lot adds $1 to the potential loss |
| $5 | 25 pips | 0.02 lots (2 micro lots) | At 0.05 lots, the loss becomes $12.50 — 2.5× the plan |
| $5 | 50 pips | 0.01 lots (1 micro lot) | At 0.02 lots, the loss becomes $10 — double the plan |
| $5 | 100 pips | 0.005 lots (if broker allows) | Most brokers’ minimum is 0.01, so this trade may not fit a $500 account at 1% risk |
Notice the last row. When the stop loss is very wide, and the account is small, correct position sizing may require a lot size smaller than your broker’s minimum. This is a real constraint on micro accounts — not a reason to increase risk.
The 1–2% rule on small forex accounts
The 1–2% rule means you risk only 1% or 2% of your total account balance on any single trade. If the stop loss is hit, you lose that percentage and nothing more (excluding slippage and spread variation). This is not the same as using 1–2% of your account as position size. It’s the maximum planned loss, not the trade volume.
On a $100 account, 1% risk means $1 per trade. On a $500 account, 1% means $5. On a $1,000 account, 1% means $10. These are small numbers, and they’re supposed to be. The point isn’t to make each trade exciting — it’s to make each loss survivable.
At 2% risk, the numbers double: $2 on a $100 account, $10 on $500, $20 on $1,000. That sounds manageable until you factor in losing streaks. Five consecutive losses at 1% risk reduce a $500 account to roughly $475. Five consecutive losses at 2% risk reduce it to roughly $451. The gap widens with each additional loss.
Risk callout: The 1–2% rule limits planned trade risk. It does not make a trade safe or guarantee the stop-loss fill price.
| Account Balance | 1% Risk Per Trade | 2% Risk Per Trade | After 5 Consecutive 1% Losses | After 5 Consecutive 2% Losses | After 10 Consecutive 1% Losses | After 10 Consecutive 2% Losses |
|---|---|---|---|---|---|---|
| $100 | $1.00 | $2.00 | $95.10 | $90.39 | $90.44 | $81.71 |
| $500 | $5.00 | $10.00 | $475.50 | $451.93 | $452.18 | $408.55 |
| $1,000 | $10.00 | $20.00 | $951.00 | $903.85 | $904.38 | $817.07 |
Figures assume each loss is recalculated on the updated balance (compounding).
The ten-loss column is where the difference becomes visible. Ten consecutive losses at 1% risk cost you roughly 9.6% of the starting balance. Ten consecutive losses at 2% cost roughly 18.3%. And ten losing trades in a row is not unusual for a beginner learning a new strategy — it’s common. BabyPips’ School of Pipsology covers why most new traders underestimate losing streak frequency and overestimate their win rate before they have statistically meaningful data.
Why beginners should learn at 1% before moving to 2%
At 2%, a rough week of five or six losses creates noticeable account damage and puts psychological pressure on the next trade. That pressure often leads to revenge trading — increasing lot size to “make back” what was lost — which breaks the risk rule entirely and turns a manageable drawdown into a serious one.
Starting at 1% gives you more room to make mistakes, more trades before the account is damaged, and more time to develop discipline. The difference in growth speed between 1% and 2% risk is small compared to the difference in survival rate during the first few months of live trading.
Why the 1% rule should stay stable as your account grows
Some trading educators argue that you should increase your risk percentage as your account grows and your confidence improves — moving from 1% to 2%, then 3%, then higher. I disagree with that approach.
Here’s why: the 1% rule already scales with your account. On a $500 account, 1% risk is $5 per trade. If discipline and edge grow that account to $5,000, 1% risk is now $50 per trade — ten times the dollar value with no change to the percentage. The rule already rewards growth. You don’t need to increase the percentage to trade larger.
What happens when you increase from 1% to 2% or 3% on a growing account is that both growth and damage accelerate. A $5,000 account at 3% risk means $150 per trade. Five losing trades in a row now cost $750 instead of $250. If those losses trigger emotional decisions — bigger lots to recover, wider stops to avoid “getting stopped out too early” — the drawdown compounds faster than the original risk plan can absorb.
The table below compares all three approaches across a $1,000 account:
| Method | How It Works | Risk Per Trade | After 5 Losses | After 10 Losses | Strengths | Main Risk |
|---|---|---|---|---|---|---|
| 1% fixed fractional | Risk 1% of current balance per trade; lot size adjusts as balance changes | $10 initially, decreasing with losses | $951 | $904 | Most forgiving; scales automatically; limits damage during losing streaks | Slower account growth; requires patience |
| 2% fixed fractional | Risk 2% of the current balance per trade | $20 initially, decreasing with losses | $904 | $817 | Faster growth if win rate is strong; still bounded | Doubles damage speed; puts more pressure on discipline |
| Fixed lot size (e.g., 0.1 lots) | Same lot size every trade, regardless of stop distance or account changes | Varies depending on stop size | Depends on the stop distance | Depends on the stop distance | Simple to execute; no calculation per trade | Ignores stop-loss distance; risk per trade changes without warning; can become dangerous as volatility shifts |
The fixed-lot approach is the most common among beginners and the most dangerous. If you trade 0.1 lots on every setup, your risk changes every time your stop-loss distance changes — but your lot size doesn’t adjust. A 20-pip stop at 0.1 lots risks $20, while a 50-pip stop at 0.1 lots risks $50. Same lot size, completely different risk exposure. This is how fixed-lot traders can be “disciplined” with entries and still blow accounts.
How to calculate position size and check exposure before entering
This is the practical section. Every trade should go through these six steps before you enter.
Step 1: Choose your risk percentage
Before you look at the chart or evaluate a setup, decide: 1% or 2%. For most beginners on accounts under $1,000, 1% is the appropriate starting point. Lock this number in and don’t change it based on how confident you feel about a trade.
Step 2: Convert the percentage into a dollar risk amount
Multiply your current account balance by the risk percentage.
Formula: Account balance × risk percentage = maximum trade risk
- $500 × 0.01 = $5 maximum risk
- $1,000 × 0.01 = $10 maximum risk
Use the current equity, not the starting balance or the amount you hope to have next month.
Step 3: Measure the stop-loss distance in pips
Place the stop loss where the trade idea is invalidated — below support for a buy, above resistance for a sell. Measure the distance in pips between your entry price and the stop level. Do not place the stop where it forces a “nice” lot size. The chart determines the stop; the stop determines the lot.
Step 4: Find the pip value for the pair and lot size
Pip value differs based on the currency pair, your account currency, and the lot unit. For EUR/USD, a standard lot has a pip value of approximately $10, a mini lot approximately $1, and a micro lot approximately $0.10. Gold (XAUUSD) uses a different calculation — a standard lot of gold is 100 oz, so the pip value structure differs from forex pairs. Always verify pip values with your broker’s contract specifications or use a position size calculator.
Step 5: Calculate lot size
Formula: Risk amount ÷ (stop-loss pips × pip value per lot unit) = position size
Example: $500 account, 1% risk ($5), 25-pip stop loss on EUR/USD, micro lot pip value = $0.10.
$5 ÷ (25 × $0.10) = $5 ÷ $2.50 = 2 micro lots (0.02 lots)
If the stop loss were 50 pips instead, the same formula gives: $5 ÷ (50 × $0.10) = $5 ÷ $5 = 1 micro lot (0.01 lots). The wider stop requires a smaller lot size to keep the risk at $5.
Step 6: Check total open exposure before entering
If you already have open trades, add their current risk to the new trade’s planned risk. Three open trades each risking 1% means 3% total exposure if all three stop out simultaneously. Before opening the new position, ask: can the account absorb the combined loss if everything goes wrong at the same time?
The daily loss limit
After step 6, consider setting a daily loss ceiling. Stopping after three planned losses in a single day prevents emotional escalation. Three losses at 1% risk is a 3% daily drawdown — uncomfortable but recoverable. Continuing to trade after three consecutive losses in a session almost always increases the damage because decision quality deteriorates under frustration.
Want a clearer way to study risk before placing trades or copying a strategy? Start with JTU’s beginner’s guide to copy trading, forex, and crypto.
Drawdown math — how losing streaks damage accounts
One wrong trade is never the real danger. You planned the loss; the stop was hit; the account absorbed it. The damage comes from sequences of losses — and the recovery math that follows.
Risk callout: Losing streaks are normal in trading. Risk rules should be built for multiple losses, not one perfect setup.
A 10% drawdown on a $1,000 account leaves you with $900. To recover, you need an 11.1% gain — slightly more than you lost. That’s manageable. A 25% drawdown leaves you with $750 and requires a 33.3% gain to break even. A 50% drawdown leaves $500 and requires a 100% gain — you need to double the remaining balance just to get back to where you started.
| Account Loss (%) | Balance Remaining (from $1,000) | Gain Needed to Recover | What This Means |
|---|---|---|---|
| 5% | $950 | 5.3% | Minor setback; recoverable within a few good trades |
| 10% | $900 | 11.1% | Manageable; this is where 1% risk after 10 losses lands |
| 20% | $800 | 25.0% | Significant; requires sustained discipline to recover |
| 30% | $700 | 42.9% | Serious damage; recovery takes weeks or months |
| 50% | $500 | 100.0% | The account must double just to break even |
| 75% | $250 | 300.0% | Near-total destruction; practically unrecoverable through normal trading |
This table is the core argument for small risk percentages. At 1% risk per trade, reaching a 20% drawdown requires roughly 22 consecutive losses — extremely unlikely with even a mediocre strategy. At 5% risk per trade, four consecutive losses already put you at roughly 19% drawdown, and eight losses would push past 33%. The 1% rule doesn’t make you money. It keeps you in the game long enough for a tested strategy to produce results.
The numbers above apply to every trader regardless of strategy, instrument, or experience level. This is pure arithmetic, and it doesn’t care about how confident you were on the trade that started the streak.
How leverage and margin can make a correct setup dangerous
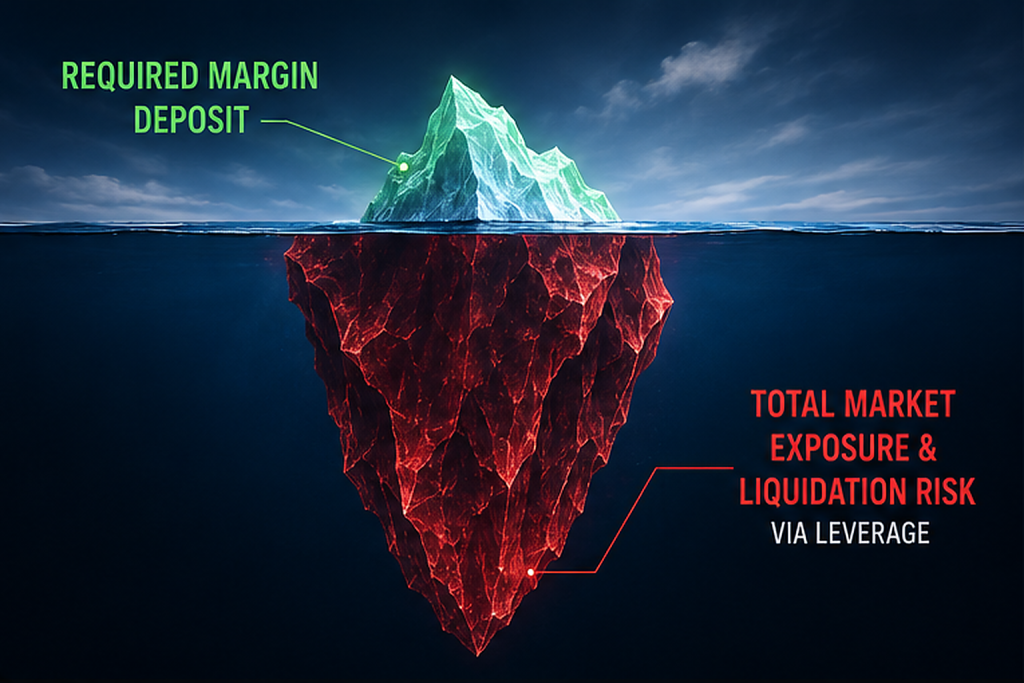
Margin is not your risk. Margin is the deposit your broker requires to hold a position open. On a $500 account with 1:100 leverage, the margin required to open a 0.1 lot EUR/USD trade might be $10 or $13, depending on the broker. That looks affordable. But if the stop loss is 50 pips away and the pip value is $1 per pip (mini lot), the actual risk on the trade is $50 — 10% of the account. The trade was easy to open, but the loss exposure far exceeds what a 1% risk plan would allow.
Risk callout: Margin required to open a trade is not the same as maximum risk. Oversized trades opened on leverage can create losses that exceed the planned comfort level.
High leverage makes this kind of oversizing easy because the platform shows available margin, not available risk. A beginner sees “enough margin for 0.5 lots” and opens 0.5 lots without calculating what a 30-pip adverse move would cost at that volume. On EUR/USD, 0.5 lots with a 30-pip stop means a potential $150 loss — 30% of a $500 account on a single trade.
The fix is the same sequence from the position-sizing section: risk amount first, stop-loss distance second, lot size third. The amount of leverage your broker offers is irrelevant to this calculation. Whether you’re trading on 1:30 (ESMA-regulated accounts) or 1:500 (offshore accounts), the risk per trade should be the same percentage. The leverage changes how much margin is required, not how much the trade can lose.
Multi-pair exposure can break the 1–2% rule.
Risk management isn’t only about each trade in isolation — it’s the total risk across all open positions. If you open three trades at 1% risk each, you have 3% of your account exposed simultaneously. If all three hit their stop losses, you lose 3% in one session. That’s still manageable. But the danger multiplies when those trades are correlated.
Risk callout: Several small risks can combine into one large account risk, especially when pairs are correlated.
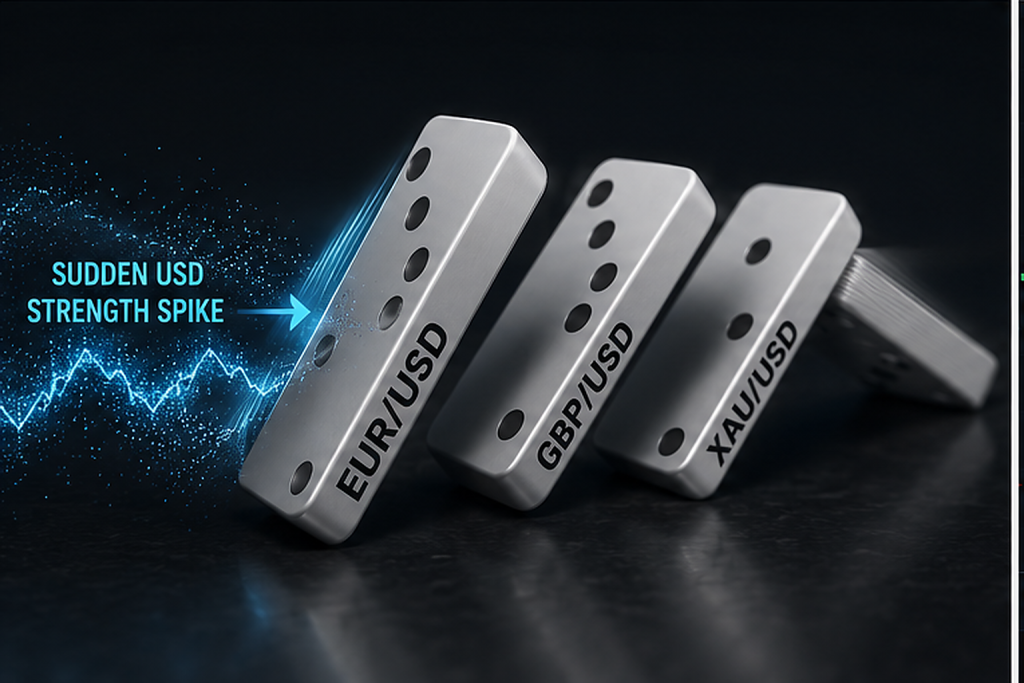
Currency pairs that share a common base or quote currency tend to move together. FOREX.com’s correlation guide explains that EUR/USD and GBP/USD have a strong positive correlation — both are driven by USD strength or weakness. If you go long on both, you’ve effectively doubled your USD exposure. A sudden dollar rally can stop out both positions at the same time, turning what looked like two separate 1% risks into one 2% loss that happens in minutes.
The BabyPips Currency Correlation Calculator shows these relationships across different timeframes and is worth checking before opening multiple positions in related pairs.
Why XAUUSD needs extra caution
Gold is more volatile than major forex pairs; spreads can widen significantly during news events, and stop-loss distances on XAUUSD typically need more room than EUR/USD or GBP/USD setups. A 200-pip stop on gold is common during active sessions, but on a micro lot, that’s already a meaningful dollar amount. At JTU, we employ hourly checks on gold positions due to this volatility and can update risk rules based on live conditions. If you’re trading gold alongside forex pairs, add the gold trade’s risk to your total open exposure before entering — don’t treat it as a separate category just because it’s a commodity.
Even if you use copy trading or an automated system, these exposure rules still apply. A copy trading setup that mirrors three correlated pairs from the same master trader can produce the same combined risk as opening those trades manually. Our beginner’s guide to copy trading covers how proportional sizing and follower risk limits work — but the underlying principle is the same: total exposure matters more than any single trade.
The practical check is simple: before every new entry, add up the planned risk on all open positions. If the combined number exceeds 3–5% of your account, close something or reduce the size before adding more exposure.
Risk management during high-impact news events
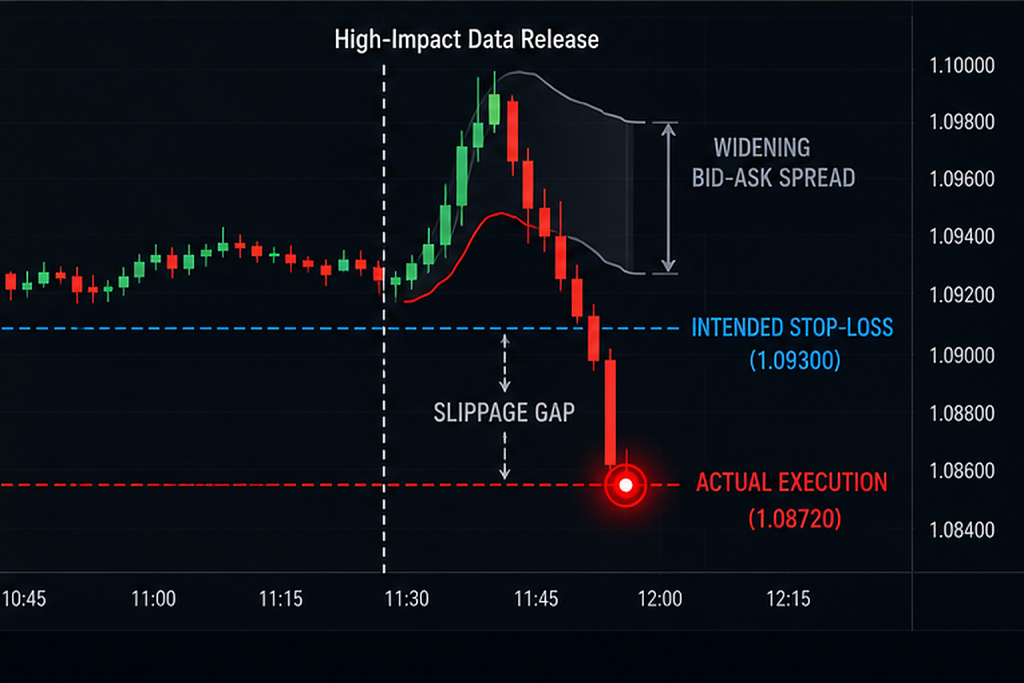
Economic releases like Non-Farm Payrolls (NFP), the Consumer Price Index (CPI), and Federal Reserve (FOMC) rate decisions create conditions where normal risk management assumptions can break down. Spreads can widen from 1 pip to 5–10 pips on major pairs in the seconds around a release. On gold, the spread can blow out further. Stop-loss orders can slip past their set level by several pips or more because liquidity disappears temporarily while the price jumps to a new level.
FOREX.com’s guide on market gaps and slippage covers why these events cause execution problems: when everyone is trying to buy or sell at the same time, and market makers pull back their quotes, orders fill at the next available price — which may not be your stop level.
For a beginner using the 1% rule, this matters because a planned 1% loss can become a 1.5% or 2% loss after slippage during a news spike. Three practical rules for handling news events:
Check the economic calendar weekly. Free calendars from Forex Factory, Investing.com, and most broker platforms flag high-impact events in red. Know when NFP, CPI, and FOMC announcements are scheduled. These dates are published months in advance.
Reduce size or close positions before the release. If you have an open trade that’s near break-even and a high-impact event is 30 minutes away, consider closing it or moving the stop to break-even. The potential for slippage during the release is not worth the marginal gain.
Avoid opening new trades in the 15–30 minutes surrounding a major release. The initial spike can reverse completely within minutes. Wait for liquidity to return, for spreads to normalise, and for a clear directional move to establish itself. This doesn’t mean avoiding news entirely — it means respecting that your risk calculations assume normal execution conditions, and news events are not normal conditions.
Position-sizing tools and calculators
You don’t need to run the position-sizing formula manually every time. Several free tools handle the calculation instantly:
MyFXBook Position Size Calculator — enter your account currency, balance, risk percentage, stop-loss in pips, and the currency pair. It returns the correct lot size. Also includes pip value, margin, and swap calculators in the same calculator suite.
BabyPips Position Size Calculator — designed for beginners. Simple interface, built into one of the most respected forex education platforms. Good first stop if you’re new to the formula.
EarnForex Position Size Calculator — more customisation options including different account currencies and commission adjustments.
Broker built-in tools — MetaTrader 4 and MetaTrader 5 don’t have a native position size calculator, but dozens of free Expert Advisor scripts and indicator plugins can be added to calculate lot size before each trade. Some brokers also offer proprietary calculators on their platforms.
Whichever tool you use, the logic is the same: risk amount ÷ (stop pips × pip value) = lot size. The calculator just removes the arithmetic errors that happen when you’re calculating under pressure with a trade setup forming on the chart.
The limits of forex risk management
Risk management reduces damage. It does not make trading safe, predictable, or guaranteed to produce profits. Four boundaries every beginner should respect:
A stop loss does not guarantee the exact exit price
A stop-loss order instructs your broker to close the trade when the price reaches a certain level. During normal market conditions, the fill is usually at or very near the stop price. During fast-moving markets — news events, gap openings on Monday morning, sudden liquidity drops — the actual exit price can be worse than the stop level. This is called slippage, and it means your planned 1% loss can occasionally become 1.3% or 1.5% even when you did everything correctly. Build a small buffer into your expectations.
Risk rules fail when you override them.
Moving your stop loss further away to “give the trade more room” defeats the purpose of the stop. Adding to a losing position increases the loss beyond what you planned. Increasing lot size after a loss to “make it back” turns a structured risk plan into a gambling pattern. The 1% rule works only when it’s followed on every trade — not just the ones that feel uncertain.
Small accounts have less room for trading costs.
On a $100 account at 1% risk, your planned loss per trade is $1. But the spread alone on a single EUR/USD trade might cost $0.10–$0.20 at micro lot size, and on some exotic pairs or during off-hours, it could be higher. Swap fees for holding positions overnight also eat into tiny accounts. These costs don’t break the account on any single trade, but they accumulate — especially if you’re scalping with many trades per day. CompareForexBrokers’ 2026 statistics page tracks spread and cost data across major brokers if you want to compare trading costs for your specific situation.
Risk management does not prove a strategy is profitable
Controlling losses is separate from having a tested edge. You can follow the 1% rule perfectly and still lose money steadily if your entries have no statistical edge. Risk management keeps the account alive so you have time to develop, test, and refine a strategy. It is not a substitute for having one.
Risk callout: Trading involves the risk of loss. Past performance does not guarantee future results. Only risk capital you can afford to lose.
Forex risk management questions beginners ask.
Is the 1% rule good for forex beginners?
Yes. The 1% rule limits the damage from any single wrong trade. On a $500 account, 1% risk means $5 per planned loss before execution differences like spreads and slippage. It gives you more trades before the account takes serious damage, which is exactly what a beginner needs — room to learn through experience without wiping out.
What is the difference between risk amount and position size?
Risk amount is the money you are prepared to lose if the trade hits the stop loss. Position size is the volume of the trade — usually shown as lot size — that determines how much each pip movement is worth. A $5 risk amount might translate to 0.01, 0.02, or 0.05 lots, depending on stop-loss distance and the pip value of the pair being traded.
How do I calculate position size in forex?
Choose your risk percentage (1% or 2%). Convert it into a dollar amount based on your current account balance. Measure your stop-loss distance in pips from the chart setup. Then calculate: risk amount ÷ (stop-loss pips × pip value per lot unit) = position size. Free calculators from MyFXBook and BabyPips do this instantly.
Can I use the 1–2% rule on a $100 forex account?
You can, but the dollar risk is very small. On a $100 account, 1% risk is $1 and 2% risk is $2. Minimum lot sizes, spreads, and stop-loss distances can make correct position sizing difficult at this level. A $100 account is useful for practicing discipline with real money, but don’t expect meaningful growth — the numbers are too small for the math to produce significant returns.
Does a stop loss guarantee I will only lose my planned risk?
No. A stop loss helps control risk, but the final exit price can be affected by slippage, spread spikes, fast news moves, weekend gaps, or broker execution conditions. This is why beginners should avoid oversizing even when a stop loss is set — the stop reduces risk, but it does not eliminate execution variability.
How much total risk should I have across open forex trades?
Track total open risk, not only risk per trade. Three open trades risking 1% each expose the account to a 3% loss if all stop out at the same time. The danger increases when the pairs are positively correlated — for example, EUR/USD and GBP/USD can move against you simultaneously during a dollar rally. As a practical ceiling, keeping total open exposure between 3% and 5% gives most small accounts enough room without creating a situation where one bad session causes disproportionate damage.
Keep the account alive first.
The entire argument of this guide reduces to one line: risk amount first, stop-loss distance second, lot size third.
If you trade a $500 account at 1% risk, your loss per trade is $5. That’s not exciting. It’s not going to produce dramatic screenshots. But it means you can be wrong 20 times in a row and still have over $400 in your account — enough capital to keep trading, keep learning, and keep refining whatever strategy you’re building.
A small account doesn’t need bigger risk. It needs tighter discipline. The 1% rule already grows with you — as your balance increases, your dollar risk increases automatically without changing the percentage. There is no need to rush the process by increasing the risk rate.
If any section of this guide resonated, put it into practice. Open a position size calculator before your next trade. Run the formula. Check your total open exposure. Set the daily loss limit. The math is simple. The discipline is the hard part — and that only develops through repetition.
Risk Disclaimer: Trading forex, gold, and cryptocurrency involves significant risk of loss and is not suitable for all investors. The use of automated trading systems, copy trading, and Expert Advisors does not eliminate risk. Past performance is not indicative of future results. Market conditions, broker spreads, slippage, and system settings all affect outcomes. Only allocate capital you can afford to lose. James Trading University provides educational content only and does not constitute personalized financial or investment advice. Always consult a qualified financial adviser before making trading decisions.